第270章:練習:既存プロジェクトを Biome に完全移行する
今日は「ESLint + Prettier(+周辺ツール)」で動いてる既存Reactプロジェクトを、Biome 1本に寄せていく練習だよ〜!🧹💨 ゴールはこれ👇
- ✅
biome.jsonがある - ✅ フォーマット&リントが Biome で動く
- ✅ VS Code の保存時フォーマットも Biome
- ✅ CI でも
biome ciが走る - ✅ ESLint/Prettierの設定ファイルや依存が消える(必要なら段階的でもOK)
今日の作業の流れ(全体像)🗺️
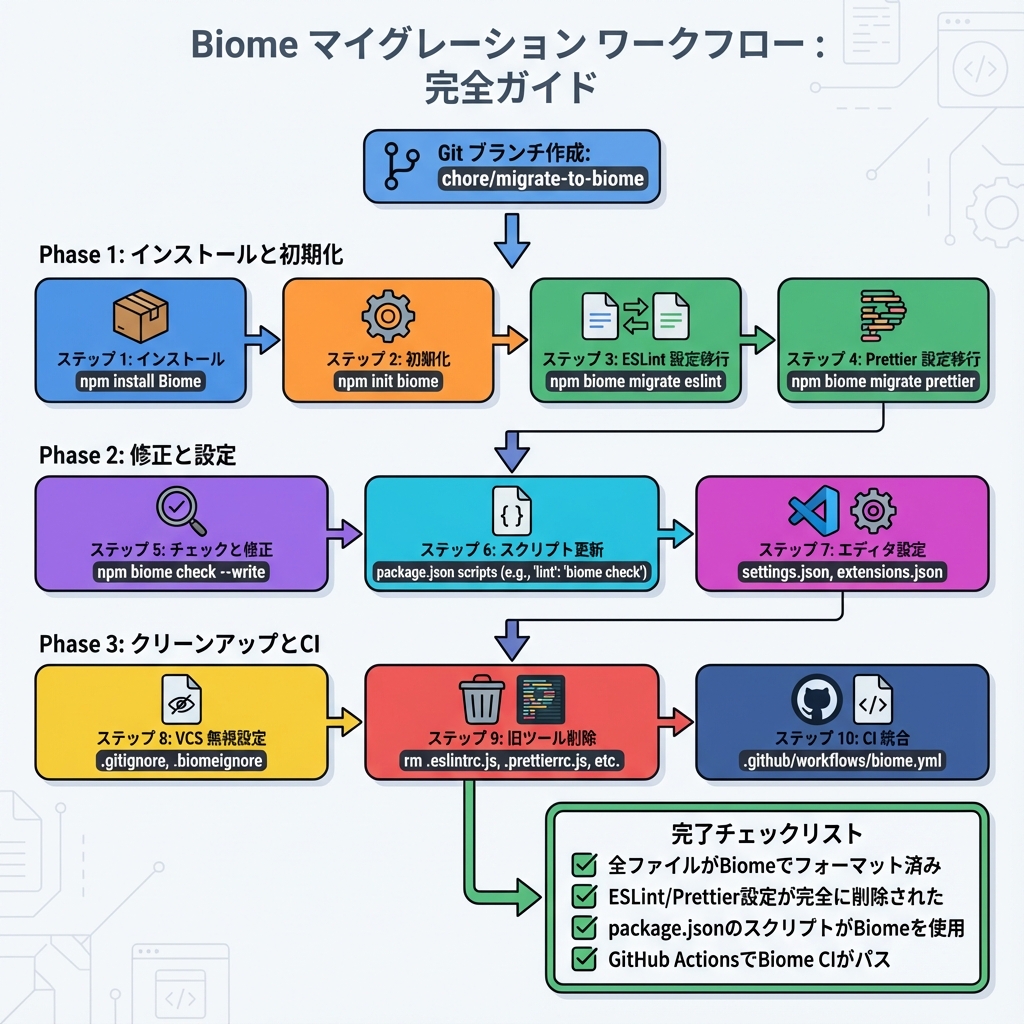
1) まずはブランチを切る 🌱🧡
移行はファイルがいっぱい変わるから、必ず分けよ〜!
git switch -c chore/migrate-to-biome
2) Biome を入れる(devDependencies)📦✨
Biomeはプロジェクトに dev dependency として入れるのが基本だよ〜!
公式も -E(固定)をおすすめしてる🧷 (Biome)
npm i -D -E @biomejs/biome
3) biome.json を作る(init)🧾
ゼロ設定でも動くけど、移行するなら設定ファイル作ろう!
init で biome.json を生成できるよ〜 (Biome)
npx @biomejs/biome init
ここで
biome.json(またはbiome.jsonc)がプロジェクト直下にできてたらOK!
4) ESLint → Biome に移植(migrate eslint)🧳
Biomeには移行コマンドがある!強い!💪✨ ESLint設定を読み込んで、Biome側のルールへできるだけ変換してくれるよ。(Biome)
npx @biomejs/biome migrate eslint --write
よくあるポイント 👀
- これ、既存の
biome.jsonを上書きすることがあるよ(公式にも注意あり)(Biome) - 「ESLintと完全に同じ挙動」にはならないこともある(オプション差など)(Biome)
- “inspired” ルールも含めたいなら👇(必要なときだけでOK)
npx @biomejs/biome migrate eslint --write --include-inspired
```` :contentReference[oaicite:5]{index=5}

---

## 5) Prettier → Biome に移植(migrate prettier)🎀

BiomeのフォーマッタはPrettierに近いけど、**デフォルト値が違う**(例:タブ/スペース)ことがあるのね。
だから `migrate prettier` で寄せちゃうのが早い! :contentReference[oaicite:6]{index=6}

````bash
npx @biomejs/biome migrate prettier --write
6) いったん全ファイルに Biome を当てる(check --write)🧼🧽
check は format + lint + import整理 をまとめてやってくれる便利コマンド!(Biome)
npx @biomejs/biome check --write .
ここでやること 📝
- ✅ 自動で直るものは一気に直す
- ✅ 残る警告/エラーは 1個ずつつぶす(焦らない💕)
7) package.json の scripts を Biome に寄せる 🔧
ESLint/Prettier を呼んでる scripts を Biome に置き換えよ〜!
例👇(プロジェクトに合わせて名前は好きでOK!)
{
  "scripts": {
    "format": "biome format --write .",
    "lint": "biome lint .",
    "check": "biome check .",
    "check:fix": "biome check --write ."
  }
}
biomeはnode_modulesに入ってれば npm scripts から普通に呼べるよ☺️
8) VS Code を「保存したらBiome」にする 🧠💡
Biomeには公式VS Code拡張があるよ!(Biome)
さらに保存時フォーマットは editor.formatOnSave を true にすればOK!(Biome)
安全な自動修正(Fix on Save)も設定できるよ〜!(Biome)
VS Code の settings.json(プロジェクト側 .vscode 推奨)⚙️
{
  "editor.formatOnSave": true,
  "editor.codeActionsOnSave": {
    "source.fixAll.biome": "explicit",
    "source.organizeImports.biome": "explicit"
  }
}
Prettier拡張が生きてると取り合いになることがあるから、Format Document With... で Biome を選んでおくと安定しやすいよ🫶
9) .gitignore を尊重させる(おすすめ)🙈✨
既存プロジェクトは生成物(dist等)を無視したいよね!
BiomeはGit連携を 明示的にON にできて、.gitignore(+ .ignore)を見てくれるよ〜 (Biome)
biome.json にこれを追加(または確認)👇
{
  "vcs": {
    "enabled": true,
    "clientKind": "git",
    "useIgnoreFile": true
  }
}
さらに、ビルド成果物は force-ignore(!!) で強めに除外もできる(dist/build など)(Biome)
{
  "files": {
    "includes": ["**", "!!**/dist", "!!**/build"]
  }
}
10) ESLint/Prettier を削除する 🗑️✨
ここまで動いたら、いよいよお片付け!🧹💕
依存をアンインストール
(例:入ってるものに合わせて消してね)
npm remove eslint prettier
npm remove -D eslint-config-prettier eslint-plugin-react eslint-plugin-react-hooks @typescript-eslint/eslint-plugin @typescript-eslint/parser
設定ファイルを削除
消してOKになりやすいもの👇
.eslintrc.*/eslint.config.*.eslintignore.prettierrc.*/prettier.config.*
11) CI に biome ci を追加する 🤖✅
CI向けには biome ci が用意されてるよ(check 相当だけどCI最適化)(Biome)
GitHub Actions 例👇
name: CI

on:
  pull_request:
  push:
    branches: [main]

jobs:
  biome:
    runs-on: ubuntu-latest
    steps:
      - uses: actions/checkout@v4
      - uses: actions/setup-node@v4
        with:
          node-version: 20
      - run: npm ci
      - run: npx @biomejs/biome ci .
よくあるつまずき 🔥(ミニ対処集)
-
🌀 “思ったより大量に差分が出た” → まずはOK!
migrate prettierで寄せても差が出ることある。1回check --write当てたら、あとは落ち着いて「残りだけ」直そ🙂 -
😵 “VS Code の保存時フォーマットがBiomじゃない気がする” → VS Code拡張が入ってるか確認&
editor.formatOnSave: trueを確認!(Biome) → それでも怪しいときは「Format Document With...」で Biome を明示指定! -
🙈 “dist まで見に行って遅い/怒られる” →
files.includesの!!**/distを入れる(強い除外)(Biome)
練習課題(この章のゴール🎯)✨
npm run check:fix(Biome一括)を作って、実際に走らせる 🏃♀️💨- ESLint/Prettier の設定ファイルを削除しても困らない状態にする 🧹
- CI に
biome ci .を追加して、PRで落ちないのを確認する ✅💕
まとめ 🎉
- Biomeは init → migrate(eslint/prettier)→ check --write の流れが超強い!(Biome)
- VS Code は保存時フォーマット&Fix on Saveで快適になるよ〜🩷(Biome)
- CI は
biome ciで締めると「チームで崩れない」状態になる!(Biome)
次の章からは、Biomeで整った世界を前提にして、さらに別の領域に突入できるよ〜!🚀💖